My mom taught me to crochet when I was 10 years old, and I've never lost my love for it over the years. Before card making, I used to consider crochet my personal "therapy." In some ways, I still do. Even now, when I go home to Mom and Dad's house, Mom and I still crochet together at times.
Currently, I'm making an afghan for our bed. It's one of many I've made through the years, but it's just a little different from the rest. My reason for the different style is that I can use up much of my yarn stash without too much additional investment. As crochet projects come and go, little tidbits of yarn are left - and no self-respecting crafter would throw away odds and ends of yarn - no matter how tiny! Eventually, though, storage space becomes an issue.
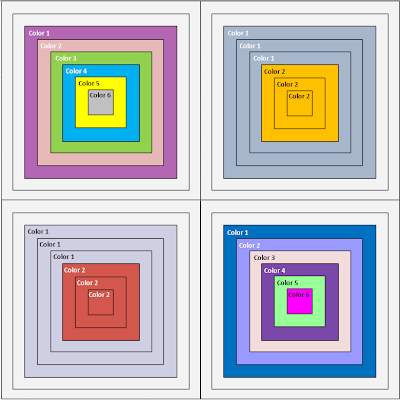
So, in thinking about my newest afghan, I wanted a design that would allow me to use most of my stash. I'm alternating, in checkerboard fashion, my style of squares:
By making one square with just two colors (3 rows of color #1 and 3 rows of color #2) and the next square true "granny" style (1 row each of 6 colors), I can maximize use of yarn depending on whether I have a lot of a color or only a little.
This method also allows me to do less planning of square placement. One of my pet peeves is to have "like" colors next to each other. I've managed to avoid it for the most part, but not entirely. That would take additional colors I don't have - and would defeat my purpose.
So, my tip for today: Decide if there's a way to satisfy more than one goal. My goals are to use up odds and ends of my yarn stash, make something I'll enjoy, and have fun! I've designed my work to satisfy that end. And it's very therapeutic! :-)
Note that my blocks are crocheted together - not sewn. Also, only two rows are completed thus far, so the squares will flatten out and be more even when the afghan is complete.
For more on how to crochet these blocks together, I've constructed a little video demo - my first! The crocheting is really quite easy - unlike learning to make a video. I hope to gain skill quickly though.
Thanks for visiting. Stay tuned for card making fun in my next post.


Great job on your video! Very clear instructions make it easy to follow. I like how close the camera was and the image quality. You have such a pleasant voice to listen to. Look forward to move videos!
ReplyDeleteWhile this was all Greek to me, I love the afghan! When I come out there, you MUST teach me!
ReplyDeleteHI, Karen. I have watched your video on crocheting granny squares together, but I don't know how to join the first two? Can you help?
ReplyDelete
DeleteHi, Ruth Ann. Thanks for writing. When you're ready to start joining squares, it's important to do 2 full rounds of the joining color and bind off on the first granny square - as a stand-alone. Then, I generally do 1 full round of the joining color on the 2nd square, and then 1 or 2 sides for the next round. Chain 1 at the corner, then slip stitch in the corner of the 1st block (granny square), chain 1, 3 dc across to the next corner. After 1 side is joined, continue to the end of the round and bind off. Hope this helps! Happy crocheting!
Hi Karen. This style of "joining a granny square", is beautiful! I just love to look at it with its class. I am having problems understanding parts of it, but, I will keep trying until I get it right! Thanks for sharing!
ReplyDelete