Showing posts with label Copic Sketch markers. Show all posts

Sunday, January 7, 2018

Walking in a Winter Wonderland...Not!

Brrrrr! Good morning!

I awoke this morning to a bone-chilling two...that's 2...degrees! As my friends from the North Pole might say, "It's not a fit day out for man nor beast!" I can't remember the last time we were so cold. I thank God that our furnace is still working. I do wish it could keep up a little better though. I had to give the munchkin (a.k.a. Winnie the mini-dachshund) a blankie, along with darling husband, of course. ;-)


While we're only expected to reach 29 degrees today, I'm looking forward to the coming week, which will attain upper 60s by Friday! Hoorah!

So, in keeping with the current situation, I'm posting a card I made a while back with a digital image from Angel's Landing. The original black-and-white illustration is the work of Judi Maddigan, and I produced the color and finished product. This is one of my all-time favorite cards!


I just love these sweet little penguin babies! They make my heart laugh! I colored them with Copic Sketch markers, and then fussy cut around the images and popped them up with some Stampin' Up dimensionals. I had some beautiful winter-themed designer paper for the background. I hope they make you laugh, too.

Well, my office is in a cold part of the house, and I'm about to seek out my own blanket. Thanks for visiting, and please come back again soon. 

You can view some additional cards in my Etsy shop (link above right), if you'd like to pay a visit. I have additional sets ready (including Valentine's Day) and will be posting them there soon.

Stay safe and warm!


Thursday, January 30, 2014

Caught Your Heart - FTHS January Stamp of the Month

Hello.

Today I'm featuring the January stamp of the month by From the Heart Stamps. It seems particularly appropriate as we are busily making our annual Valentine creations.

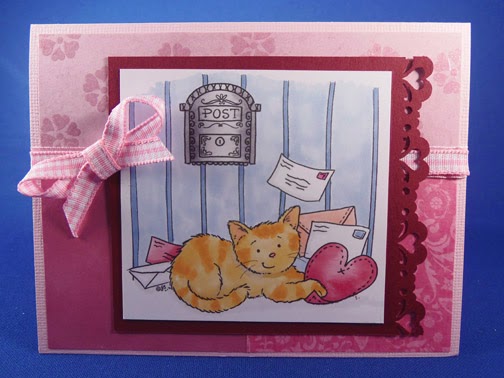
This cute little kitty is doing what many kitties do: holding a heart. So, 'fess up now.  Is there a kitty holding your heart? 

I will forever remember the time when I was small, and my grandmother always had a cat about. I can remember two that captured me especially. One was a big old tomcat named...you guessed it, Tom! Tom weighed 18 pounds and loved to curl up in my lap, purr, and fall asleep while he got a good rub. 

Then there was "Kitty Baby." Ha! Guess we weren't very original, huh? Kitty Baby was a Persian-Angora mix. She was a deep dusty shade of bluish-gray and had really long fur. I loved her dearly and she was a great addition to our extended family. Then, disaster struck. I was tested for allergies, and being found positive for cats, my grandmother decided it wouldn't do to have Kitty Baby in the house when I visited on weekends.  I was devastated when she gave our little blue angel to my cousin in the next state! Oh my, it was a terrible time. After many years of owning dogs as an adult, I can only imagine how hard that must have been for her. Still, I knew it was only her great love for me that made her do it.

Well, back to my card. This little cutie is colored with Copic Sketch markers. It also features a Fiskar's heart border punch in red, along with a couple of pink papers and plaid pink and white ribbon.


Here's a close-up shot of some of the coloring. I had a lot of fun with stripes in this image.


I repeated the heart border in one of the same papers on the inside of the card to add interest. This card will go to someone in the family who's a cat lover.  Hmmm...now who will it be? So many choices!


Some of you may realize this card used sketch challenge #50 at From the Heart Stamps. As usual, I missed the challenge deadline, which typically comes around much faster than I have time or energy to meet. Oh well, it's still a nice sketch. In fact, I'll be flipping it to feature another cute Valentine card in my next post. After that, I have a new scrapbook page lined up to share.

Thanks for joining me. There are lots of exciting new projects coming up, including a new crocheted lap afghan with an interesting stitch. For those digging out from Winter Storm Leon, or experiencing these extreme, low temperatures in the single digits, I pray you're safe and warm. Peace.

Saturday, December 21, 2013

Winter has arrived?

Hello everyone.

It's hard to believe that wintertime officially arrived today. Normally it's in the 20s to 40s this time of year, but today?  It was mid 70s!  Really.  I went out in just a light sweatshirt and thought I'd roast before I could get home and change it!

It may seem funny to comment on an unusually warm winter, but...that much warmth this time of year generally spells storms.  Tomorrow is expected to be no different. We're supposed to have thunderstorms and wind. Hold onto your lawn ornaments!

Well, now for a bit cheerier subject - my card for the day. This cutie is Candy Cane Anneke, the December stamp of the month by From the Heart stamps. Check out other gallery entries here.  (No one can say I'm not loyal, as I feature of lot of their digital images.) I have lots of other brands, but find these images incredibly fun to color with my Copic Sketch markers.


My Copic color choices include:
Hat and candy cane: R22, 24, 29, 39, 59, 89
Skin: E00, E11, BV00
Cheeks: R20
Eyes: B00
Hair: E50, E31, E44
Dress: B63, B66, B69
Boots: E42, E55, E35
Outline and white shading: W1

Here's a closer look:


This card features navy blue cardstock, white X-Press It blending card for the image, Spellbinders Nestabilities Lacey Ovales die cut, a royal blue oval taped behind the die cut for depth, and Liquid Pearls accents on Echo Park 6x6 "Winter Wishes" paper pad.

And on the inside, I have more Echo Park paper, along with my greeting from Hero Arts Stamp and Cut Season's Greetings set.


I had a wonderful time creating this little darling. In fact, I really couldn't help myself as I made several cards from this image with various color combinations and designs.


The first and third images directly above also feature embossed snowflakes in white opaque, as well as some gold and diamond colored Stickles in the center of the designer paper snowflakes. Hope you enjoy my fun cards.
 
Now, to all you and yours, may you have a safe, happy, healthy Christmas. May God bless us each and every one, as we celebrate once again the newborn King!

Sunday, November 17, 2013

My "Big" Brother

Hello.

My card for today recently marked the birthday of my "big" brother. Dan is three years my senior and was always there for me growing up. I'll always remember how he scared the neighborhood bully away from me when he caught him twisting my arm behind my back. He "politely" informed him that if he ever bothered me again, he'd have to come through him first! Wow! What a day that was. I think it's the first time I realized that my brother actually loved me. For anyone who has one, you know that brothers don't just go around getting all mushy with their little sisters.  :-)  He didn't exactly declare his love that day either, (although he has many times since), but his actions spoke loudly enough.

Anyway, Dan and I don't get to see each other much any more. We live 250 miles apart, and he works six days a week through most of the year. I only get to go home about 3-4 times a year, and since Dan's a truck driver, the last thing he wants when he's off is to get in a vehicle and drive.  With only one day off a week, he would be driving more than visiting anyway.

Well, here's Dan's card for the year.  I tried to make it masculine, but I expect the best I can hope for is that this is sort of gender neutral. I tried to go a little rustic with background papers and the bulky twine for the bow. At any rate, I know he was glad to be remembered.


For this card, I used Flourishes' Pinwheels and Popsicles stamp set.  I cased this card from Tosha Leyendekker, in a card she called "planted pinwheels." Her card was uploaded to the Flourishes gallery on September 1, 2013. 
 
The pinwheels are colored with Copic Sketch markers. The excellent design of the stamps meant it only took a few minutes to color each pinwheel - with a great result!
 
I've already made numerous cards with this set, which is very versatile.  I repeated a shadow-ink pinwheel for the inside of the card. (See the faint image at bottom right.) The corners of the white cardstock are punched and embossed.
 
 
Well, that's it for today. The hour is late, and tomorrow starts another big week at work. It's also time to count down the days until my husband's first cousin and her husband are coming to us for Thanksgiving. We can't wait! We always have such fun!
 
Thanks for visiting, and please stop back soon for another card. I should also have a new video coming soon.  May God bless!
 

Sunday, July 28, 2013

Mixed Media - Copic Markers and Watercolor

Mixing media is all the rage these days, so my topic for today is mixing Copic Sketch markers and watercolor. I started with a lovely image from a practice exercise in the new Copic Coloring Guide: Level 4: Fine Details by Colleen Schaan and Marianne Walker. While I consider coloring the image a fairly advanced process, or at least labor intensive, the mixing of media itself is very simple.

There are a couple of things to know before you get into the video:
(1) I didn't focus on the coloring process today. I colored the main image in advance.
(2) I used X-Press It Blending Card as my paper stock. Blending Card is formulated for use with Copic markers, but doesn't necessarily handle watercolor very well. A nearly-dry aqua (water) pen is key to success.
(3) When mixing media with Copic markers, always do the Copic coloring first. Laying down color on top of another medium is not recommended and may not be successful.
 
Here's a photo I took in mid-process. Take a look at the differences between the left and right sides of the picture.  On the left side of the screen, the image has been stippled with three different colors of Copic markers.  (Stippling simply indicates random dots applied with the tip of my markers.) Then, I have scribbled a random line of watercolor pencil outside the male gnome's hat and body. Water has not yet been applied to the left side of the image.


Compare the left and right sides of the background image. A watercolor wash has been applied to the right side, providing a smooth, blended look.

On the right side of the screen, stippling has also been done. Watercolor pencil has been applied to the right of the female gnome's hat and body - and water has been applied with an aqua pen to provide a color wash. Notice the much smoother, blended look.

This process is very simple, but to get a better feel for it, here's a short video that shows how it's done:


Now that you've seen the process in action, take a look at my finished image (below). After shooting the video, and completely disregarding guideline #3 at the top of this post, I decided that I wanted more "pop" from the couple. To add dimension, I went back in with a Copic marker and outlined the outer edges of the image with a thin line of marker.  Note how much more dimensional they look with the final outline.

A final Copic marker outline was added to enhance dimension


Don't quite see it?  Squint your eyes and look again. You'll see a lovely, dimensional aspect that places the couple front and center in the image.

Well, that's it for today. I hope you enjoyed today's mixed media demo. Please join me again soon as we explore more artistic techniques. And may God bless!

Saturday, July 13, 2013

A Colorful Day

From the Heart's July stamp and sketch of the week challenge are so much fun that I just sailed right through getting them done. Now, for anyone who knows me, you know that's extremely unusual! In fact, I've already completed two cards with this adorable digital stamp. My first card is for weekly sketch challenge 025. It's a 6" x 6" card.

FTH Sketch025 Challenge
For those who'd like to play along with the sketch challenge, here's the link. You can also find the painting ladybug digital stamp here. Projects for the stamp of the month challenge must be uploaded by the end of July.
 
Here's the second card project, which is a traditional sized 4 1/4" x 5 1/2" card. I've included a close-up of my coloring with Copic Sketch markers.
 
Ladybug is about to add red to her flowers

A "colorful" card for a colorful friend
For those interested in the mechanics of the coloring for this card, I used the following colors: R29, R39, C5, and C9 for the ladybug. For the flowers, Y0000, Y11, and Y13. The painted dots are V000, V01, and V05 (violet); B11 and B15 (aqua); and RV02 and RV04 (pink). The paint brush is E31, Y28, and W1. Grass and leaves are YG00, YG17, and YG25.  Finally, the sky is B21 and B24.
 
My base card stock for the challenge (6x6) card is Bazzill Sunbeam, and the smaller card is American Crafts Sunflower. Both use X-Press It blending card for the colored image. The die cut circle is picot edge circles from Spellbinders.
 
The "Life is Fun..." sentiment is Simple Thoughts - Laughter from Cloud9 Design. The "wishing you a colorful day" sentiment comes with the ladybug image from From the Heart stamps.
 
I hope you like this whimsical image and my use of it here. Thanks for stopping by, and please join me again.