Showing posts with label coloring. Show all posts

Thursday, January 30, 2014

Caught Your Heart - FTHS January Stamp of the Month

Hello.

Today I'm featuring the January stamp of the month by From the Heart Stamps. It seems particularly appropriate as we are busily making our annual Valentine creations.

This cute little kitty is doing what many kitties do: holding a heart. So, 'fess up now.  Is there a kitty holding your heart? 

I will forever remember the time when I was small, and my grandmother always had a cat about. I can remember two that captured me especially. One was a big old tomcat named...you guessed it, Tom! Tom weighed 18 pounds and loved to curl up in my lap, purr, and fall asleep while he got a good rub. 

Then there was "Kitty Baby." Ha! Guess we weren't very original, huh? Kitty Baby was a Persian-Angora mix. She was a deep dusty shade of bluish-gray and had really long fur. I loved her dearly and she was a great addition to our extended family. Then, disaster struck. I was tested for allergies, and being found positive for cats, my grandmother decided it wouldn't do to have Kitty Baby in the house when I visited on weekends.  I was devastated when she gave our little blue angel to my cousin in the next state! Oh my, it was a terrible time. After many years of owning dogs as an adult, I can only imagine how hard that must have been for her. Still, I knew it was only her great love for me that made her do it.

Well, back to my card. This little cutie is colored with Copic Sketch markers. It also features a Fiskar's heart border punch in red, along with a couple of pink papers and plaid pink and white ribbon.
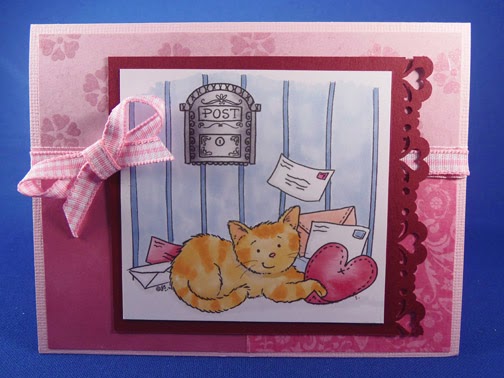

Here's a close-up shot of some of the coloring. I had a lot of fun with stripes in this image.


I repeated the heart border in one of the same papers on the inside of the card to add interest. This card will go to someone in the family who's a cat lover.  Hmmm...now who will it be? So many choices!


Some of you may realize this card used sketch challenge #50 at From the Heart Stamps. As usual, I missed the challenge deadline, which typically comes around much faster than I have time or energy to meet. Oh well, it's still a nice sketch. In fact, I'll be flipping it to feature another cute Valentine card in my next post. After that, I have a new scrapbook page lined up to share.

Thanks for joining me. There are lots of exciting new projects coming up, including a new crocheted lap afghan with an interesting stitch. For those digging out from Winter Storm Leon, or experiencing these extreme, low temperatures in the single digits, I pray you're safe and warm. Peace.

Sunday, June 30, 2013

A Sea Turtle for Summer

Isn't nature amazing?!?  Today I'm sharing a new image I picked up from...you know where...From the Heart Stamps. I know, I know, I'm like a broken record! I do own lots of other stamps, I promise, and one of these days soon I'm going to post a number of cards from them. For today, though, I have this new digital stamp of a sea turtle.  I had such great fun with this one.


Now before you start thinking that my coloring is all wrong, or really weird, take a look at my inspiration photo for this one. I simply did a quick Google search on "sea turtle image," and this is what I found. Isn't it a beauty?!  My thanks to GulfMex.org for posting it.

Image found at http://www.gulfmex.org/wp-content/uploads/2012/05/SEA-TU1.jpg on June 25, 2013

We have such a wonderful, colorful world, and reality is almost always more interesting than fiction! Sometimes when I'm coloring an image I like to see what a creature, or flower, or something else, actually looks like.  So, I run a quick search on the Web and find tons of choices. I usually print out my favorite and then attempt to copy it from real life.

Of course, my choices are always limited by my Copic marker inventory. For this image, the turtle shell is E07 and YR07 (brights), E19 (accent), and E40 (base). The head, neck and fins are E50 (base), Y32, YR21, and YR15.

This image also has a sandbucket and shovel (YR02, YR07, Y18, Y35, B24, and B26). The ocean water and accent color in the fan shell are BG000 and BG10. The starfish has various earth tones from the E colors of Copic Sketch markers.

Finally, I employed a few different colors for the sand.  My base is E42 (sand white), with spots of E40 and E51.  I finished it off with the Atyou Spica Glitter Pen in clear color. It made the sand look like little specks of shiny gold! I hope you can see a bit of shine in the sandbucket and in the sand between the bucket and the mama turtle.


Enjoy! And stay tuned for more cards and scrapbooking treasures over the next few weeks. We're gonna get scrappy around my house! Thanks for stopping by.

Thursday, June 27, 2013

There are Always Flowers

This Friday marks a turning point in my life: my boss is retiring. Now, I don't know that she would want her name or photo posted on a blog, so I'm not including them.  She has a really unique name, so it wouldn't be fair. Still, I want to pay a short tribute to her, even though she'll probably never see it. It doesn't matter; she doesn't seek praise. She does what she does to be true to herself.

Some people might be glad to see a boss retire, but not me - not this one. I dearly love my boss. She's been my mentor, my inspiration, my source of knowledge, and in many ways my friend for the 2 1/2 years I've had my job. I know that a new leader is coming in, and I have the greatest respect for what she'll bring. I'm not worried about leadership; I'm simply sad to say farewell to my dear friend.

You may wonder what makes her so memorable for me. So, this is what I can say. "L" is always even-tempered; I have rarely seen her flustered. She always has a kind word to say, and for her the glass is always half-full. Most of the time, it's all-full. She meets frustration on my part with a simple phrase, "Calm down." Then when my spirit is quiet, we tackle challenges together. (I find this somewhat funny, as I always thought I was calm!)

"L" has been preparing me for her retirement for the length of my service in my job. She was fulfilling her own commitment before retiring and has stayed on long after most would have departed.  She has maintained her integrity and done her work faithfully for a long time. She is beloved by many - and sought out for her counsel constantly. Her shoes will be hard to fill.

Because of who "L" is, I made a special easel card for her staff to sign. It carries a quote from Henri Matisse: "There are always flowers for those who want to see them."  She liked that sentiment! And the flowers I get to see today are that we have promised to see each other and have lunch from time to time. While I'll miss her day-to-day, it isn't goodbye forever!  Praise God!


The flowers are dogwoods from Hero Arts. This is a single stamped image. The card is an easel card made from several different card stocks, including Bazzill and Neenah Classic Crest. The dogwoods are colored with Copic markers in pink and green. Coloring was super simple, as the shading for the flowers and leaves is already stamped from the image; there's no guesswork about where to shade.
 
The design for the easel part of the card came from a Split Coast Stampers tutorial by Beate Johns. I made my card a standard 5.5 inches wide, rather than the 4 1/4" she used. All other measurements were the same. This easel was super simple!
 
Thanks for reading my tribute to "L" and please join me again for a really fun card!


Sunday, June 16, 2013

Happy Father's Day

I am truly blessed to still have my father with me this year. He's had some tough times with health in the last few years, but he's 84 and always finds a way to laugh and appreciate a bit of humor. That's why I'm hoping he'll enjoy this cute digi from From the Heart Stamps. It's called Necktie Banner and this is my first card with it.


Now, I don't remember that Dad had any particularly ugly ties when I was growing up - and these are pretty tacky. In fact, I remember Dad having very good taste when it came to ties.  Some of those trendy polyester suits, though...well, let's just say I'm glad that fashion has departed from our culture. One of these card ties might have fit in very nicely at that point. :-/
 
Anyway, I completed the look on the inside of the card with a simple wish:


Here's how I made the card:
I used American Crafts wave-colored card stock, added designer paper from Lily Bee Design Buttercup 6x6 Tiny Tablet, and colored with Copic markers. Colors include B24, B26, Y13, Y18, YR02, YR07, G21, G24, R21, R24, and C1. I used Ranger Distress Ink in Broken China for the edges of the image, and finally popped up the design with Stampin' Dimensionals.  And that was it!  I hope you like it.
 
Meanwhile, for all you fathers out there, young and old, may your children honor you this day (and every other) for all that you do for them. May you all be good dads and give your children the best future you can. God bless you for all you do!
 
Thanks for stopping by today and please come again soon.
 

Friday, May 17, 2013

Using a Digital Stamp for Copic Coloring - Inks and Papers

Hi. Welcome to today's post.

Today I'm wrapping up the project that I previewed last Friday: Humble Anneke. This sweet little girl just melted my heart when I first saw her. Anneke is a digital stamp by From the Heart Stamps.

For those who haven't tried a digital stamp, it's important to remember that the type of printer ink makes a difference in how your colored image turns out. Apparently laser printers are best when printing digital stamps for use with Copic markers - but I have an inkjet. I've successfully printed digital images and avoided any bleed-out of the image, but I've also had a few that weren't so successful. I've been told that either heat-setting the image, or letting it dry for a day or two, may help with this issue. Either way, I recommend giving it a try when you have time to test your papers and inks. (I have printed my images thus far on Neenah Classic Crest solar white card stock. The preferred "Blending Card by X-Press It" used by many Copic artists may work better. I haven't yet tried it for digital images, but can attest to its wondrous results for coloring!) 

I started the coloring process on Anneke with her hair. As you can see, her hair is long and wavy. Wavy hair is a bit more complex than straight hair – and requires a different technique. Each strand of hair should be colored separately. Strands that appear to be part of an outer layer will catch light and should be highlighted. Likewise, hair that curves outward will catch light. Artists typically use Copic marker numbers ending in 0-3 for highlights.  For this image, my highlight (base, or undertone) color is E31. The midtone is E35, and the darkest color is E37. This is a natural blending family.

After laying down a base of E31, I used a flicking method (from the crown down and from the tips up) to establish the dark colors with E37. Finally, I did minimal blending with the E35 midtone.


For Anneke’s skin, I chose E000, E21, E04, and BV000.  Yes, that’s right, there’s a blue-violet in there!  Why?  Because blue and violet are complementary colors to yellow and orange, the tone of most people's skin. The blue-violet helps to calm down the stark contrast in the shading.


Now, you may be thinking at this point that her skin still has some really serious contrast happening. That's true, and this is one of the scariest things about coloring with Copic markers until you get used to the idea of it. Most beginning artists over-blend and really tone down a lot of contrast. (And by the way, I definitely consider myself a beginning artist.) The hope, though, is that the greater contrast will add depth and beauty to the image.

The final steps were to finish Anneke's clothing and accessories. I chose two complementary colors: blue-violet and yellow. At long last, she became the focal point of this lovely card. I used Bazzill card stock, Spellbinders Nestabilities picot edge circles for the white background, Simon Says Stamps "You" set for the sentiment, and Mark Richards Crystal Stickers colored with Copic BV13 for embellishment. I hope you like my final result.


Thanks for visiting, and please stop by again for a brand new topic.  Happy Friday!

Tuesday, May 14, 2013

Using Masks to Test Color Options

Hi. Today's tip is really simple - but ultimately very useful.

Last Friday, I introduced you to Humble Anneke. As I worked to complete my project with Anneke, I had to make some decisions. One of them was about color.

I started with Anneke's hair and skin, and then progressed to her clothing. I knew I wanted a blue-violet "apron," as well as a contrasting yellow color. But when it came time to decide whether to use white for the main color and add yellow polka dots, or use a yellow base with white dots, or some other combination, I just couldn't decide.

Now, after you've spent a tremendous amount of time coloring, you don't want to mess something up and be unsatisfied with it! After a few minutes, the perfect solution came to me: test out the combinations before adding them to the actual image!

So, I pulled out my brand new, unopened Copic bleedproof marker pad and used a multiliner pen to trace the appropriate part of the image. I repeated this a couple of times. I colored the images with different color combinations and then fussy-cut them out. I placed the pieces on the image one at a time and chose my favorite one. Then I colored the actual image with my choice.

Testing color options using masks


Final color choice after testing

If you don't happen to have a Copic bleedproof marker pad, don't worry. You could just as easily use vellum to trace or stamp your image, then color and cut it out. Take care though; vellum may have some bleed through, and if you're tracing on your original image, you could ruin it.

My final color choice was slightly different from both masks. I ended up using a very pale yellow (Yellow Fluorite, Y0000) base, with darker yellow polka dots, sash, and bows (Y23, Y32, and Y35).

I also attempted to draw in a cast shadow to ground Anneke on the card stock, but had a bit of a mishap there. So, I ended up fussy-cutting her, too. As you might imagine, cutting out Anneke changed my idea for the card, so please be patient with me as I move toward a completed card. I'll post it just as soon as it's complete.

Thanks for visiting. I hope you find today's tip helpful, and I hope you'll join me again soon to wrap up this project. Peace!

Sunday, May 12, 2013

Happy Mother's Day!

Hello. Mother's Day has arrived once again, and I continue to be blessed to have my dear Mom in my life on this very special day. Mom, if you're reading, Happy Mother's Day, and I pray you have many more!

I also wish all other mothers a blessed day, as well.  I can't think of a more important job in this world than the one you have. You all are to be commended for pouring your heart and hands into your children's future. May they honor you in return now and in the years to come.

Finally, for those women who nurture their spouses, their pets, siblings, cousins, aunts, uncles, nieces, nephews, friends, or anyone else, your role is important, too! Please continue to offer your special brand of love, and you will surely be blessed.

Today I offer this card featuring a digital stamp called "Gathering Hearts." It's offered for download by From the Heart Stamps. It's a wonderful image to use with Copic markers. I promise to offer a coloring video in the near future, but for today I'll simply tell you the Copic colors I used for the various elements.


Hair:  E11, E18, E19
Skin:  E00, E11, BV00
Flower in Hair: Y11, Y19
Hearts: R29, R39, 0 Colorless Blender (careful: Reds bleed very easily!)
Dress: BG11, BG15
Pail: C1, C5
Shoes: C1 (shading only)
Grass: YG17, YG25

For anyone who wants a closer look:


This image is colored on Neenah Classic Crest solar white cardstock and mounted on American Crafts woven cardstock in robin's egg blue. The die cut is Spellbinders Nestabilities Decorative Labels Eight.

Thanks for visiting. Have a wonderful day - and may God bless!

Friday, May 10, 2013

Copic Coloring Guide: Level 3: People

Happy Friday! Thanks for joining me.

Today I want to share a Friday favorite! Several weeks ago, I purchased the Copic Coloring Guide: Level 3: People by Colleen Schaan and Marianne Walker. (I also own Level 1, but I'll save that for another time.) I must say that Colleen and Marianne have really outdone themselves with this book.


I am truly astounded at how much I've learned - and so quickly, too. With a focus on "people" one might expect to learn about skin, hair, and faces - and not much else. Not so! Those topics are covered in great detail, but there are so many additional helpful hints along the way that I will keep the book handy at all times as a reference.

I won't give away too much content here, as that would be unfair to the authors, but I can share a few favorite tidbits such as:

  • Always "light" a featured image from the face to give it importance; i.e. the face should be highlighted and the back in shadow - unless there is a specific artistic reason to do otherwise.
  • Skin tones change as people age. Babies and toddlers are the purest and have a pinker tone. Older people are more "pasty."  Oh my!  Sounds terrible, doesn't it? Well, don't worry. We older folks are still beautiful!
  • Don't use a colorless blender on a face; it can leave the image looking splotchy.
  • Most people color clothing/fabric in solid colors. Much clothing is patterned. Use advanced techniques to add patterns to clothing. (I'll feature this in a coming post.)

Finally, the Copic Coloring Guide has numerous colored card samples. All materials are listed. I have already discovered a number of new sources for digital stamps, which I find fascinating - and less expensive than other types of stamps.

Today's image is a work in progress. This is "Humble Anneke" by From the Heart Stamps. (See link at right.) I'm using stepped images, and today I have the hair complete. Here's a little preview of an upcoming post.
 
 
Thanks for visiting. Please join me again to see how Humble Anneke turns out.  May God bless!