Showing posts with label die cut. Show all posts

Monday, October 28, 2013

Printing on Die Cut Paper

Hello.

I was asked recently to create a card for our church's staff appreciation. The only direction I received from my Sunday School classmates was "make it big!"  So, I gave my imagination a little workout and decided to create a 12" x 12" card.  Not knowing precisely what it might look like, I made the trip over to Michael's to see what might strike my fancy.

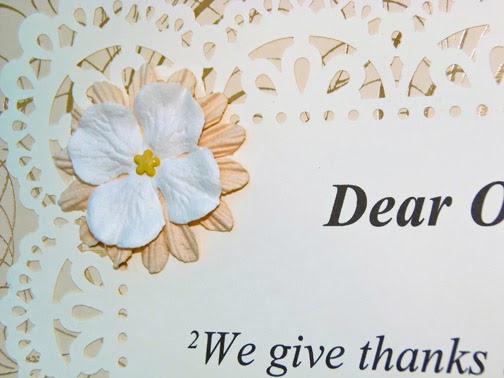
Within about five minutes of entering the store, I knew precisely what I wanted to do. I found a beautiful, decorative designer paper for the base of the card - and then chose a lovely die cut paper upon which to print a verse of scripture. I purchased a piece of 12" x 12" chipboard to mount the card on, and purchased a couple of sheets of plain cardstock for signatures on the back. When I got home, I dusted off a display easel that I've had for many years.

Here's what my completed card looks like:


Now, after telling a dear friend what I was doing, she suggested I talk about printing on the die cut paper. It looks very delicate - and in fact it is a bit.  It's cardstock weight, but still, the odd shape and cut-outs presented a challenge not to tear or jam in my printer.  So, I pulled out my Scrapbook Adhesives brand repositionable E-Z Dots and rolled the tape onto the back edges of the die cut.  I then mounted it on a solid sheet of 12" x 12" paper, and put it in the printer. The "carrier" sheet did precisely what I wanted; it provided a standard piece of paper to go through the printer rollers.  The die cut stayed affixed to the carrier sheet and the verse printed beautifully on the intricate paper. Then I simply unmounted the die cut sheet and re-mounted it on my background paper.  Easy!  No tears; no smudges; no problem.

Here's a little video on how to print the verse on the die cut paper:


So, that's my tip for today.  I hope you give this a try the next time you want to print on a piece of intricate die cut paper.

Thanks for stopping by.  I hope you'll come again soon.  May God bless!

Saturday, July 13, 2013

A Colorful Day

From the Heart's July stamp and sketch of the week challenge are so much fun that I just sailed right through getting them done. Now, for anyone who knows me, you know that's extremely unusual! In fact, I've already completed two cards with this adorable digital stamp. My first card is for weekly sketch challenge 025. It's a 6" x 6" card.

FTH Sketch025 Challenge
For those who'd like to play along with the sketch challenge, here's the link. You can also find the painting ladybug digital stamp here. Projects for the stamp of the month challenge must be uploaded by the end of July.
 
Here's the second card project, which is a traditional sized 4 1/4" x 5 1/2" card. I've included a close-up of my coloring with Copic Sketch markers.
 
Ladybug is about to add red to her flowers

A "colorful" card for a colorful friend
For those interested in the mechanics of the coloring for this card, I used the following colors: R29, R39, C5, and C9 for the ladybug. For the flowers, Y0000, Y11, and Y13. The painted dots are V000, V01, and V05 (violet); B11 and B15 (aqua); and RV02 and RV04 (pink). The paint brush is E31, Y28, and W1. Grass and leaves are YG00, YG17, and YG25.  Finally, the sky is B21 and B24.
 
My base card stock for the challenge (6x6) card is Bazzill Sunbeam, and the smaller card is American Crafts Sunflower. Both use X-Press It blending card for the colored image. The die cut circle is picot edge circles from Spellbinders.
 
The "Life is Fun..." sentiment is Simple Thoughts - Laughter from Cloud9 Design. The "wishing you a colorful day" sentiment comes with the ladybug image from From the Heart stamps.
 
I hope you like this whimsical image and my use of it here. Thanks for stopping by, and please join me again.

Tuesday, May 21, 2013

Triple Treat Border Punch

Hi. It's been very rainy here lately, which is really great for growing things of all sorts, but it does tend to dampen the spirit a bit.  Still, instead of letting the blah weather get me down, I decided to turn it to practical use!

Today I turned my Fiskars Sunburst border punch into a triple treat by using it three times to achieve a new look for a card. This whimsical image, titled "Drenched" is once again by From the Heart Stamps. I can't seem to get away from these adorable digitals!


I printed my image on Neenah Classic Crest solar white cardstock and colored it with Copic Sketch markers in primarily purple and yellow shades. I die cut it using Spellbinders Nestabilities Labels Eight. And although it's difficult to tell from this photo, I used Glossy Accents on the raindrops and water puddle for some shine.

On the inside, I repeated the Fiskars sunburst borders twice. I tried lining up the punches exactly, but decided the result was too formal for this image. This offset punch pattern reminded me a bit of a running stream of water between the yellow and white papers.


And that's it! I hope you like the look of my triple treat punch. Thanks for visiting, and please join me again soon.